Part 3 of 4: A walk-through on creating Config Profiles for each EBIS 5 module that will send data to QBO
EBIS 5 Access Requirements: User must have Advanced Access account to create Config Profiles used with the QBO Integration in EBIS 5
Jump to Section:
A Config Profile is a group of configuration settings that tells EBIS on how to map/represent the data sent over from EBIS to QuickBooks. These are required for W/Os, OTC invoices, or P/Os before records from those modules can be sent from EBIS 5 to QBO.
- W/O, OTC Invoices, and P/O Modules all require at least one Config Profile to be created prior to syncing
- If only one Config Profile is created for each module, that profile will automatically be assigned as the default for each record
- If multiple Config Profiles are created for each module, the first profile created will be assigned as the default unless manually updated
- Individual records can have Config Profiles applied directly under the Config & Billing Tab of the record
- Each module has different settings for Config Profiles, which are outlined in detail below
Work Order
To create a Config Profile for the Work Order Module in EBIS 5, proceed to (Config ![]() > Config (under QuickBooks section in the sidebar) > Work Order Tab) and click the + in the top right of the Configure QuickBooks section
> Config (under QuickBooks section in the sidebar) > Work Order Tab) and click the + in the top right of the Configure QuickBooks section

Main
Once the Config Profile is created, the Main Section of the W/O Config Profile will have the following options:
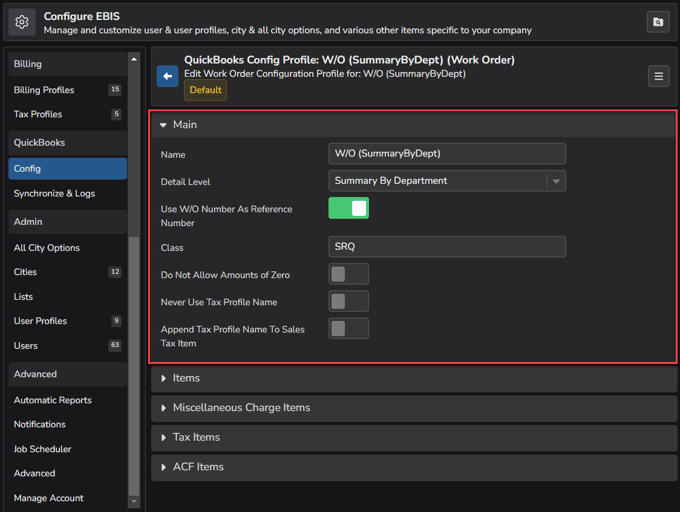
- Name: Name of the Config Profile
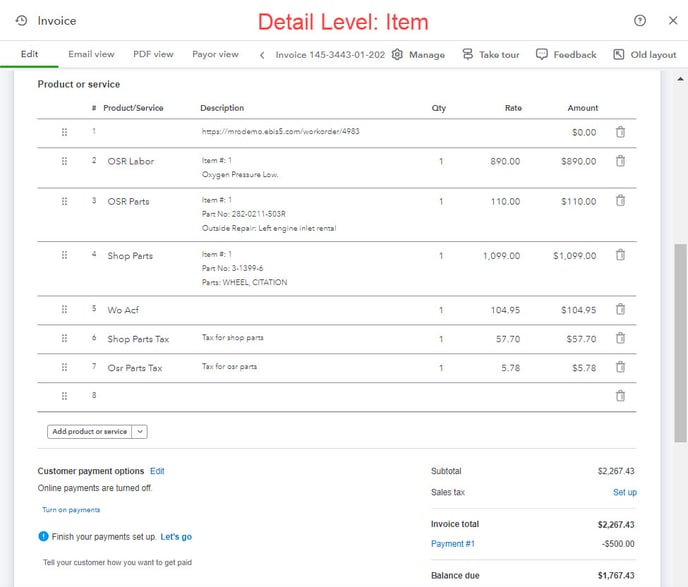
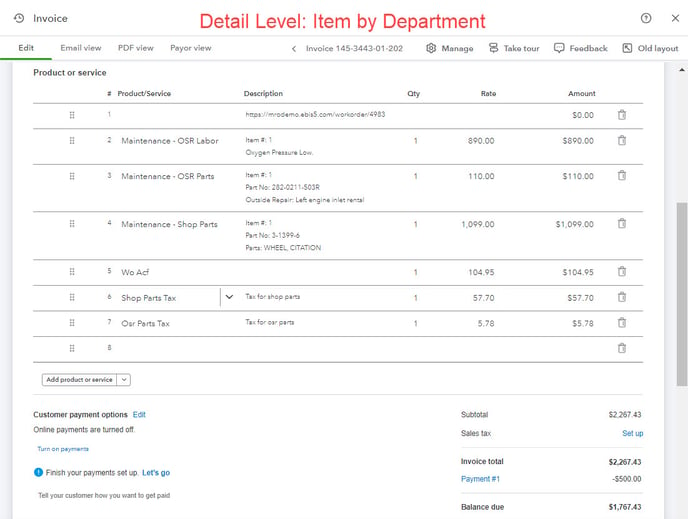
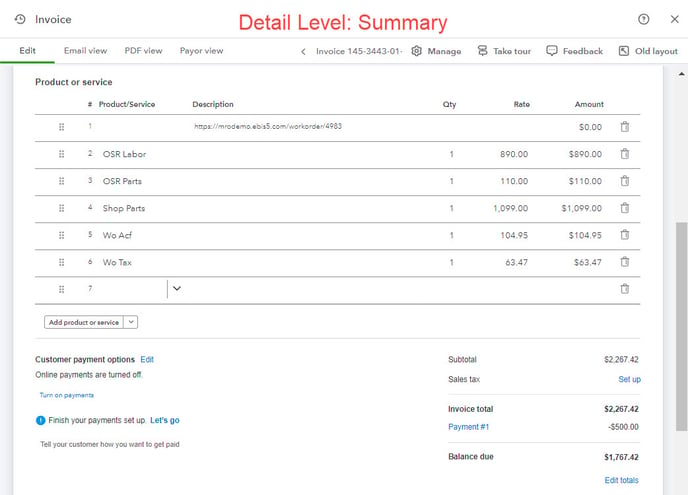
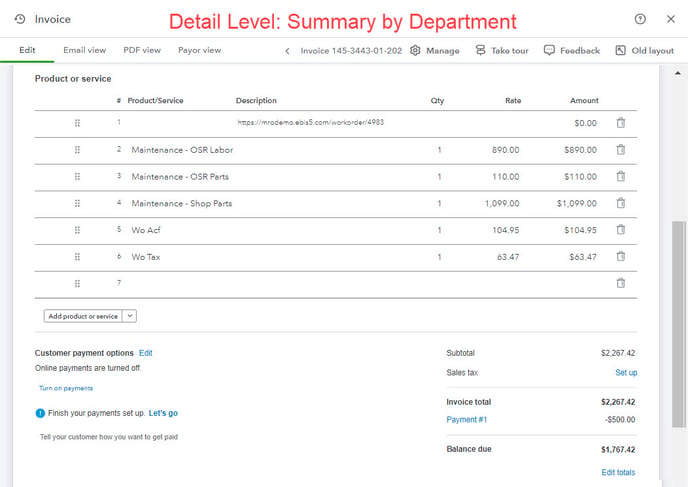
- Detail Level: the amount of detail sent to QBO to display on the invoice (see screenshots below for examples of each formatting option)
- Item: includes item level details from W/O grouped by item category
- Item by Department: includes item level details from W/O grouped by department and category
- Summary: W/O subtotals grouped by item category (does not include item details)
- Summary By Department: W/O subtotals grouped by department and by category (does not include item details)
- Use W/O Number as Reference Number: enable this setting to use the EBIS W/O or
R/O number instead of a sequential QuickBooks invoice number. If this setting is disabled, the W/O information will appear in the memo field on the QB invoice. - Class: if using “Class Tracking” in QBO, all appropriate transactions can send over a particular class name to QuickBooks by entering that name here.
- Do Not Allow Amounts of Zero: enable this setting if you want EBIS to exclude any W/O records with $0 totals from sending to QuickBooks
See screenshot below for examples of each Detail Level formatting option:
- Item: includes item level details from W/O grouped by department
- Item by Department: includes item level details from W/O grouped by category and department
- Summary: W/O subtotals grouped by category (does not include item details)
- Summary By Department: W/O subtotals grouped by category and by department (does not include item details)
Items
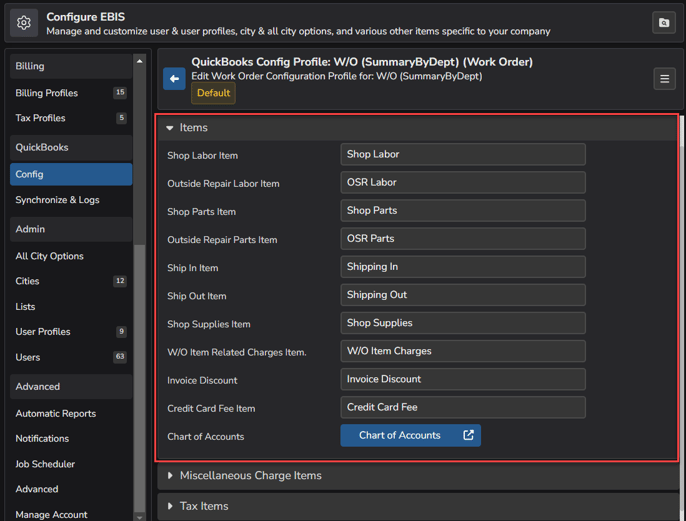
Enter the QBO items to be used when syncing W/Os from EBIS - this will specify where each subtotal from the invoice will go on a QBO invoice. If the QBO Item does not already exist or does not match exactly what is typed into each field, a new item will be created in QuickBooks when synced.
Example: Find Shop Parts Item on this list. In this example, the value "Shop Parts" is entered. This means that the subtotal of shop parts (not including outside repair parts) for the W/O or R/O will be transferred to a QuickBooks invoice using the QuickBooks item "Shop Parts".
The blue Chart of Accounts button can be used to drill-down and link QBO items/accounts to all available EBIS items at once (mass association).
Miscellaneous Charge Items
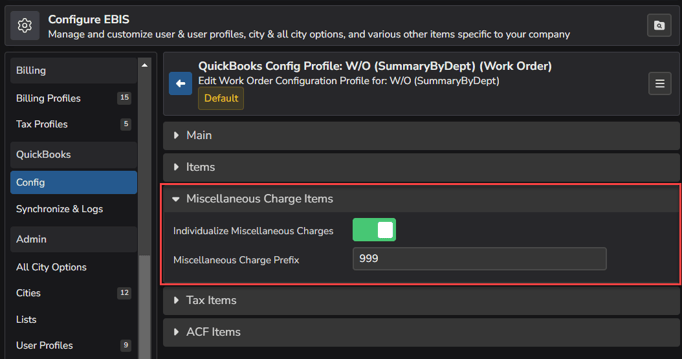
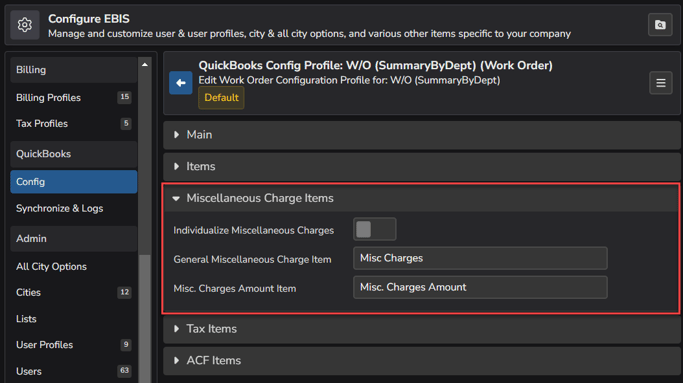
The option to Individualize Miscellaneous Charges can be toggled on or off.
- If enabled (toggled on), EBIS will send individual line items to QBO for each miscellaneous charge:
- Miscellaneous Charge Prefix: a string (numbers and/or letters) can be entered here to send these miscellaneous charges to QBO with a specific prefix to differentiate from other charges
- If disabled (toggled off), EBIS will send one line item that includes all miscellaneous charges from that W/O. Enter the QBO Items to be used when a W/O contains items related to miscellaneous charges:
- General Miscellaneous Charge Item
- Misc. Charges Amount Item
Tax Items
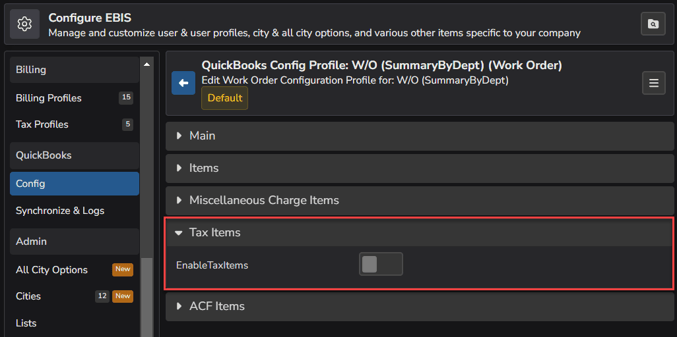
The option to EnableTaxItems can be toggled on or off for Work Orders.
- If enabled (toggled on), EBIS will send tax related data to QBO on W/Os that have this Config Profile assigned and the below additional options will display:
- Individualize Tax Items:
- If enabled (toggled on), EBIS will send individual line items to QBO for each tax charge and the fields to enter the QBO Items to be used when a W/O contains tax related items will display:
- Individualize Tax Items:
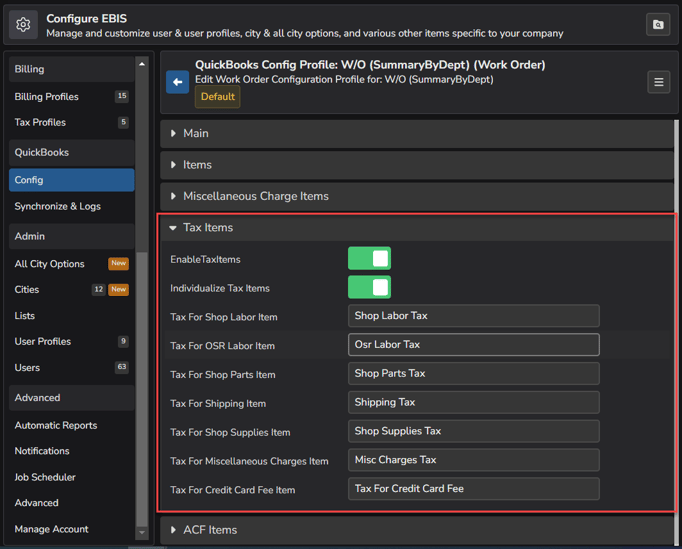
-
-
- If Individualize Tax Items is disabled (toggled off), EBIS will send one line item that includes all tax charges for that W/O. Enter the QBO Items to be used when EBIS sends one value for tax.
-

- If disabled (toggled off), EBIS will not send tax related items to QBO on W/Os that have this Config Profile assigned
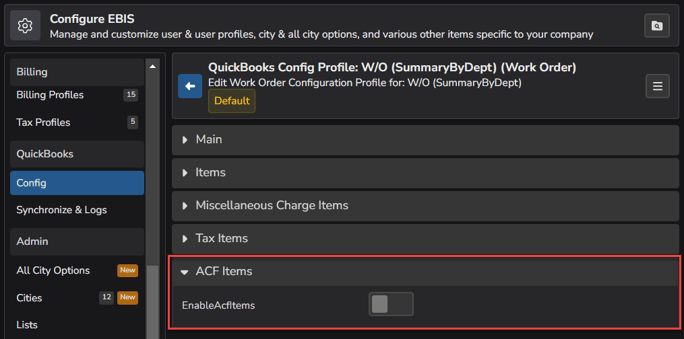
ACF Items
The option to Enable Acf Items can be toggled on or off to choose if ACF related items should be sent to QBO for Work Orders.
- If enabled (toggled on), EBIS will send ACF related data to QBO on W/Os that have this Config Profile assigned and the below additional options will display:
- Individualize ACF Tax Items:
- If enabled (toggled on), EBIS will send individual line items to QBO for each ACF tax charge and the fields to enter the QBO Items to be used when a W/O contains ACF related items will display:
- Individualize ACF Tax Items:
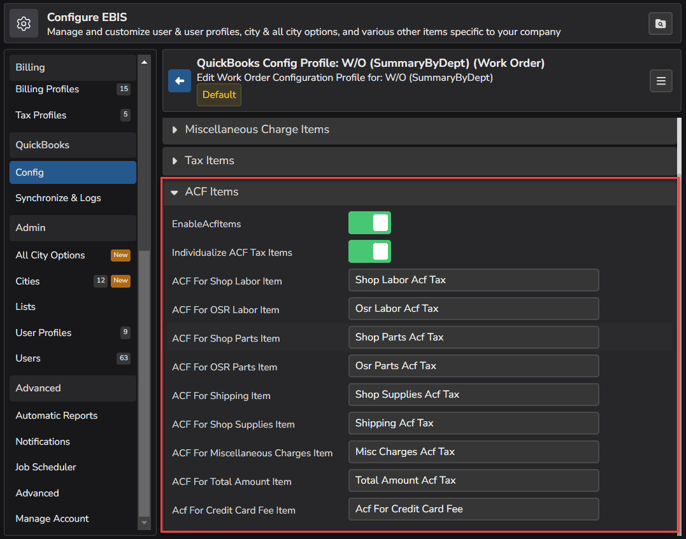
-
-
- If Individualize ACF Tax Items is disabled (toggled off), EBIS will send one line item that includes all ACF tax charges for that W/O. Enter the QBO Items to be used when EBIS sends one value for ACF fees.
-
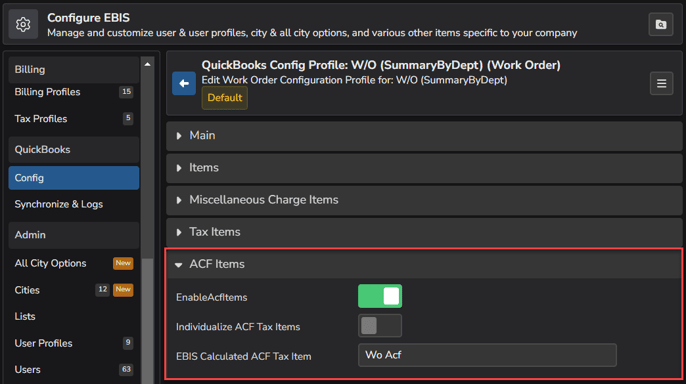
- If Enable Acf Items is disabled (toggled off), EBIS will not send ACF related items to QBO on W/Os that have this Config Profile assigned
OTC
To create a Config Profile for the OTC Module in EBIS 5, proceed to (Config ![]() > Config (under QuickBooks section in the sidebar) > OTC Tab) and click the + in the top right of the Configure QuickBooks section
> Config (under QuickBooks section in the sidebar) > OTC Tab) and click the + in the top right of the Configure QuickBooks section

Main
The Main Section of the OTC Config Profile has the following options:
- Name: Name of the Config Profile
- Class: If using “Class Tracking” in QBO, all appropriate transactions can send over a particular class name to QuickBooks by entering that name here.

Items
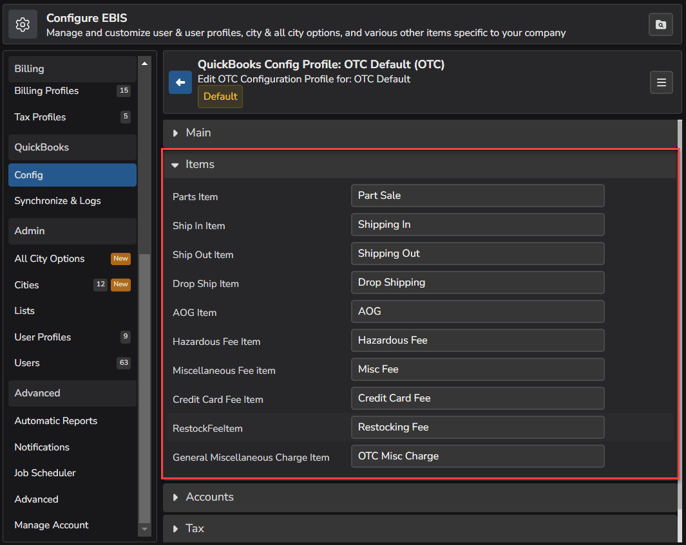
Enter the QBO items to be used when syncing OTC invoices from EBIS - this will specify where each subtotal from the invoice will go on a QBO invoice. If the QBO Item does not already exist or does not match exactly what is typed into each field, a new item will be created in QuickBooks when synced.
Example: Find Parts Item on this list. In this example, the value "Part Sale" is entered. This means that the parts subtotal on the OTC invoice will be transferred to a QuickBooks invoice using the QuickBooks item "Part Sale".
Accounts
Enter the Deposit Bank Account Name from QuickBooks. This option is required for OTC returns.

Tax
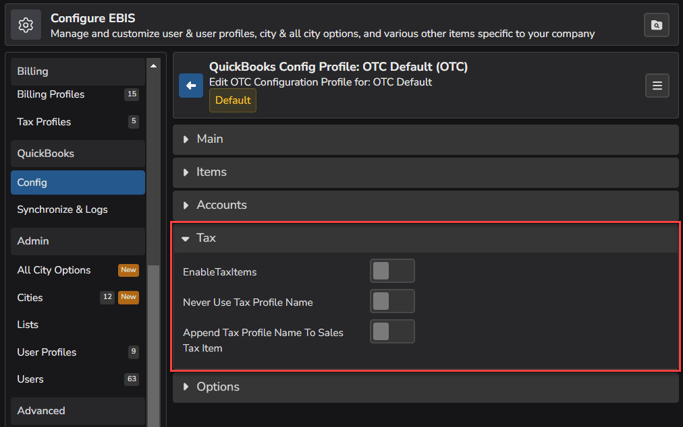
The option to Enable Tax Items can be toggled on or off for OTC invoices.
- If enabled (toggled on), EBIS will send tax related data to QBO on OTC invoices that have this Config Profile assigned. Once enabled, the fields to enter the QBO accounts will display.
- Tax Profile Settings:

- If Enable Tax Items is disabled (toggled off), EBIS will not send tax related items to QBO on OTC invoices that have this Config Profile assigned.
- Tax Profile Settings:
Options
The following settings can be found under the Options section when creating OTC Config Profiles:
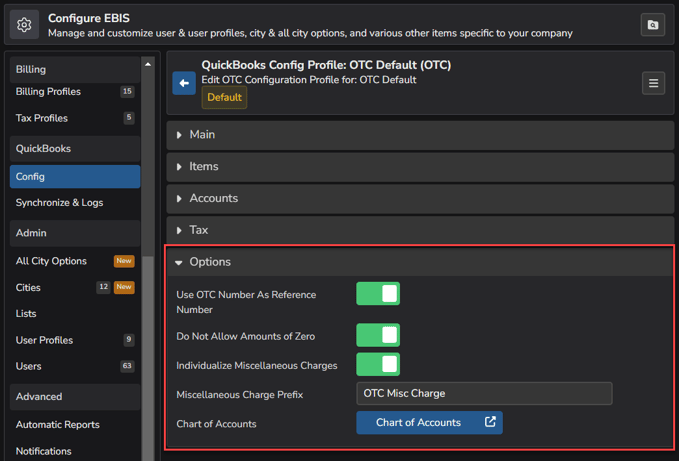
- Use OTC Number as Reference Number: enabling this option will try to use the EBIS OTC invoice number instead of a sequential QuickBooks invoice number. If this setting is disabled, the OTC information will appear in the memo field on the QBO invoice.
- Do Not Allow Amounts of Zero: enable this setting if you want EBIS to exclude any OTC records with $0 invoice totals from sending to QuickBooks
-
Individualize Miscellaneous Charges:
- If enabled (toggled on), EBIS will send individual line items to QBO for each miscellaneous charge.
- Miscellaneous Charge Prefix: a string (numbers and/or letters) can be entered here to send these miscellaneous charges to QBO with a specific prefix to differentiate from other charges.
- If enabled (toggled on), EBIS will send individual line items to QBO for each miscellaneous charge.
-
- If disabled (toggled off), EBIS will send one line item that includes all miscellaneous charges from that OTC invoice

Purchase Order
To create a Config Profile for the Purchase Order Module in EBIS 5, proceed to (Config ![]() > Config (under QuickBooks section in the sidebar) > Purchase Order Tab) and click the + in the top right of the Configure QuickBooks section
> Config (under QuickBooks section in the sidebar) > Purchase Order Tab) and click the + in the top right of the Configure QuickBooks section

Main
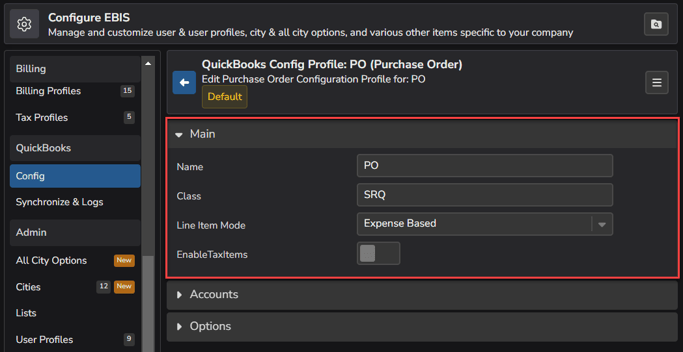
The Main Section of the Purchase Order Config Profile has the following options:
- Name: Name of the Config Profile
- Class: If using “Class Tracking” in QBO, all appropriate transactions can send over a particular class name to QuickBooks by entering that name here.
- Line Item Mode: sections displayed below Main will vary based on the option selected here
- Item Based: if P/O data should be sent to QBO as items (vs. expenses), the section below will show Items for mapping to QBO
- Expense Based: if P/O data should be sent to QBO as expenses (vs. items), the section below will show Accounts for mapping to QBO
- Enable Tax Items: If enabled (toggled on), EBIS will send tax related data to QBO on P/Os that have this Config Profile assigned and the field to enter the QBO account to be used when a P/O contains tax related items will populate in the Items section below (only if Item Based is selected in the drop-down for Line Item Mode)
Items
If Item Based was selected in the drop-down for Line Item Mode in the Main Section, enter the QBO Items to be used when syncing P/Os from EBIS - this will specify where each subtotal from the P/O will go on a QuickBooks invoice. If the QBO Item does not already exist or does not match exactly what is typed into each field, a new Item will be created in QuickBooks when synced.
Example: Find Service Parts Item on this list. In this example, the value "Service Parts" is entered. This means that the parts subtotal for the P/O will be transferred to a QuickBooks invoice using the QuickBooks Item "Service Parts".

Accounts
If Expense Based was selected in the drop-down for Line Item Mode in the Main Section, enter the QBO Accounts to be used when syncing P/Os from EBIS - this will specify where each subtotal from the P/O will go on a QuickBooks invoice. If the QBO Item does not already exist or does not match exactly what is typed into each field, a new Account will be created in QuickBooks when synced.
Example: Find Stock Account on this list. In this example, the value "1430 - Maintenance Inventory" is entered. This means that the subtotal for the stock parts on the P/O will be transferred to a QuickBooks bill using the expense account "1430 - Maintenance Inventory".

Options
The following settings can be found under the Options section when creating Purchase Order Config Profiles:
- Set Customer Job: enable this setting to send customer information when a P/O was created from a W/O (include the customer information from the W/O)
-
Separate by Receive Date: enable if items on the P/O had different receive dates and should be separated by date of receipt.
- Split shipping: enabling this feature will split shipping cost and allot to each item (Ex: 3 items with $30 shipping charge on P/O would allot $10 shipping charge to each item)
- If disabled, shipping charges will appear on a "Parent" P/O document for the whole P/O. However, if checked, shipping charges will appear on each document, relevant to that document. These charges will be taken from the receive logs. (Note: if the sum of Part Shipping In from the receiving records can be greater than the Part Shipping In can be entered on the P/O > Config & Info page)
- Split shipping: enabling this feature will split shipping cost and allot to each item (Ex: 3 items with $30 shipping charge on P/O would allot $10 shipping charge to each item)

Set a Config Profile as Default
If multiple Config Profiles have been created for any of the modules, the first one that you created will be assigned as the default. You can set any of the profiles as the default to apply when a Config Profile has not been applied to the individual W/O, OTC invoice, or P/O.
To set a Config Profile as a default, open the profile, select Set Default from the hamburger menu in the top right of the of the Config Profile and confirm via the pop-up box that displays.

Next up: Sync Data to QBO
Part 4 of the QBO integration documentation will walk-through how to sync data from EBIS 5 to QuickBooks Online.