
Part 4 of 4: A walk-through of the different options for syncing data from EBIS 5 to QBO
EBIS 5 offers the option of sending a broad range of data to QBO or the ability to drill down and send data from one specific record.
Bulk Sync
From the Synchronize & Logs section of the QuickBooks Config, you have the option of pushing all settings, modules, and supporting items at once by specific date range or by all unsynced records.
- Supporting Items (Terms, Account Names, Classes, and Items)
- Vendor
- Customer
- P/O
- OTC Invoice
- W/O Invoice
- User (these are EBIS Users, generally only synced when using Time Clock option)
- Time Clock
- Payment
- Payment Method
- Force QuickBooks Update
- Range
- Unsynchronized: this will sync any of the selected options with QBO that have not been previously synced since the Start Date listed on the QuickBooks General Config Tab
- Edited Since (choose Date Range): selecting a date range will only sync the selected items that have been created or edited during the given time frame.

Individual Record Sync
If syncing all records isn't required, EBIS 5 also offers the ability to easily push individual records to QBO. Simply pull up the W/O, OTC invoice, or P/O, update the Config Profile (if needed), and select the Push to QuickBooks option from the record.
Apply a Config Profile to an Individual Record
To update the Config Profile attached to a W/O, OTC invoice, or P/O, the record must be in an Open status. Attempting to change the Config Profile while the record is in a closed/completed status will return an error.
A Config Profile can be applied to an open individual W/O, OTC invoice, or P/O (when using a Config Profile other than the default) directly through the Config & Billing (for W/Os and OTCs) or the Config & Info (for P/Os) tab of the specific record. Select the QuickBooks Config Profile drop-down that should apply to the record and Save. On the next sync, that record will send to QBO with the newly applied Config Profile settings.
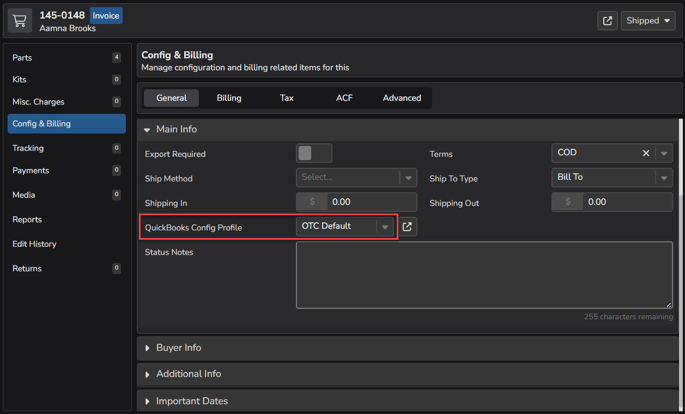
The screenshot below shows where the QuickBooks Config Profile setting is found on the Config & Billing Tab of an individual OTC record
Sync an Individual Record
To sync a W/O or OTC invoice to QBO, the record must be in a Closed status. A PO can be synced once it has at least one receiving record (Partially Fulfilled). The Push to QuickBooks button will not display on the record until the status is corrected.
A W/O, OTC invoice, or P/O can be pushed to QBO individually, when a full sync isn't required. To push a specific record for the first time, pull up the record in EBIS 5, confirm it's in a Closed status, select the green receipt icon, and then Push to QuickBooks.

If the W/O, OTC invoice, or P/O record in EBIS 5 has previously been synced with QBO, the sync options will differ from a new record and the below will display:
- Go to QuickBooks Record: opens QBO in a new browser tab and will display that specific W/O, OTC invoice, or P/O record in QuickBooks.
- Push to QuickBooks (Synced): pushes the updated data for the W/O, OTC invoice, or P/O record from EBIS 5 to QBO.

Sync Additional Items
The below list of additional data can also be individually synced from the specific record.
Note: The option shown on many of the records below to Associate QuickBooks Record Manually will only allow for associating an EBIS record with an already existing QuickBooks record. It will not allow for creating a new QuickBooks item/account/record.
- Customers
- To send a specific Customer record to QBO, proceed to the individual Customer record, where the green QuickBooks option will display, offering the options of Go to QuickBooks Record, Push to QuickBooks, or Associate QuickBooks Record Manually.

- To send a specific Customer record to QBO, proceed to the individual Customer record, where the green QuickBooks option will display, offering the options of Go to QuickBooks Record, Push to QuickBooks, or Associate QuickBooks Record Manually.
- Vendors
- To send a specific Vendor record to QBO, proceed to the individual Vendor record, where the green QuickBooks option will display, offering the options of Go to QuickBooks Record, Push to QuickBooks, or Associate QuickBooks Record Manually.

- To send a specific Vendor record to QBO, proceed to the individual Vendor record, where the green QuickBooks option will display, offering the options of Go to QuickBooks Record, Push to QuickBooks, or Associate QuickBooks Record Manually.
- User (these are EBIS Users, generally only synced when using Time Clock option)
- To send a specific User record to QBO, go to Config
 > Users (under Admin) > (Select the user), and the green QuickBooks button will display, allowing you the option to Push to QuickBooks or Associate QuickBooks Record Manually.
- Selecting to Associate QuickBooks Record Manually will pull up a list of users already available in QuickBooks to link with the current EBIS user account.

- To send a specific User record to QBO, go to Config
- Time Clock
- To send an individual time clock record for a specific User, go to Time Clock (Module) > Detail > (Select a record) (click link under hours column), and the green arrow Push to QuickBooks option will display

- To send an individual time clock record for a specific User, go to Time Clock (Module) > Detail > (Select a record) (click link under hours column), and the green arrow Push to QuickBooks option will display
- Payment
Note: Payment records can be pushed before the parent W/O or OTC record is Closed, but once the parent record is pushed, the payments will be associated with that record.
-
- For W/Os, proceed to Config & Billing > Payments of the individual record, where the green arrow Push Payment(s) to QuickBooks option will display

- For OTCs, proceed to the Payments Tab of the individual record, where the green arrow Push Payment(s) to QuickBooks option will display

- For W/Os, proceed to Config & Billing > Payments of the individual record, where the green arrow Push Payment(s) to QuickBooks option will display
Review Sync Logs
Once records have been synced, the status of the sync can be reviewed under Config ![]() > Synchronize & Logs (under QuickBooks), showing if the sync was successful or returned an error.
> Synchronize & Logs (under QuickBooks), showing if the sync was successful or returned an error.
Filter Options
Options for filtering the sync results are listed below:
- Record type (Customer, W/O Invoice, Time Clock, etc.) using the first drop-down
- Successful Synchronizations vs. Errors in the second drop-down
- Date range by using the calendar option to select a date or Synchronization Run by selecting the date/time of the sync in the third drop-down (switch between Date Range and Synchronization Run by clicking the blue Date Range/Synchronization Run button)
