
Sending a Backup
The following MUST be done from the server machine (and not a client machine):
- If a recent backup exists -- it is probably in a folder such as:
- C:\Program Files\Microsoft SQL Server\MSSQL10.EBIS\MSSQL\Backup
- C:\Program Files\Microsoft SQL Server\MSSQL\MSSQL\Backup
- C:\EBis Backups
- Please grab that file and skip to step 3. Otherwise, from the server computer, log into EBis with an account that has Data Admin Access.
- If a recent backup does not exist –
- Start EBis 3.2 on the server machine and log in with an account that is an admin. Go to the Admin Menu > Show Admin Menu > Data Admin Functions, and select “Backup Database”. Save it to your c:\ drive – the root folder of your c drive (c:\) is preferred as this SQL backup does not like long file paths.
- Once it has been backed up, go to this directory and zip this backup file with Windows itself (right click on the file itself and select Send To > Compressed (Zip File) or another program such as WinZip
- Upload the file via a service such as Dropbox or Google Drive, and send us a link to download the file, either via the intake form link sent to you or via support@datcomedia.com
Sending Media Files
The instructions above are for the EBis database. This does not include any media files:
- If you attach photos or PDFs to work orders, parts, etc., you can also send us your "EBis Shared" folder.
- This is normally on your server and is a public share - in it you will most likely have your company logo and an "EBis FIles" folder.
- Please zip the "EBisShared" folder and upload to Dropbox/Google Drive, etc. and send us a link.
- If the size is very large, you may want to use a different compression tool such as 7-Zip: https://www.7-zip.org/download.html
Sharing files via Google Drive
Google Drive is an easy way to share a large file with the EBIS team. Instructions can be found below:
Quick Version:
A quick rundown of how to share a file once it's uploaded to Google Drive can also be found below:
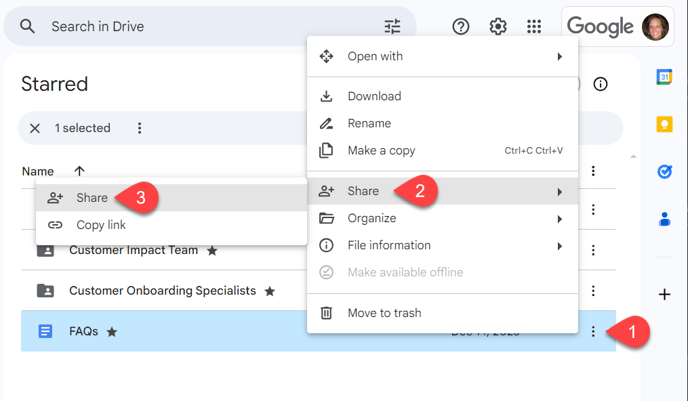
- Once the file has been added to a Google Drive folder, click the 3 vertical dots to the right of the file name
- Click Share
- Click Share again, which will trigger a pop-up box to display with additional sharing options
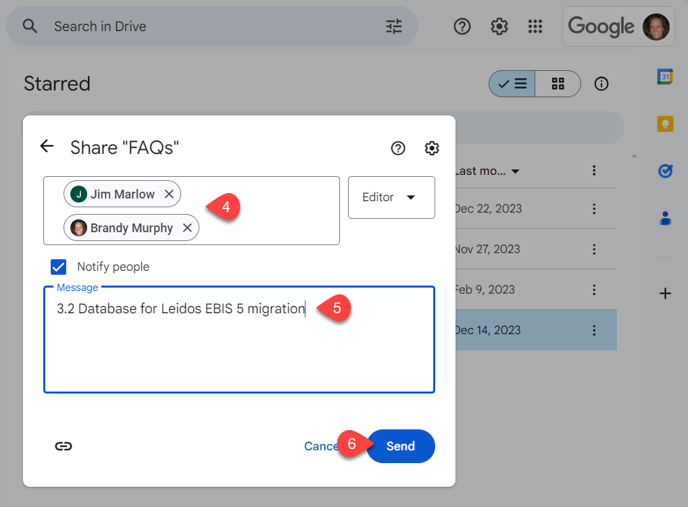
- In the Share pop-up box, enter the email addresses of your EBIS Onboarding Manager and jim@datcomedia.com.
- Leave a note/message (optional)
- Click Send, which will shoot a link to the email addresses entered and allow access to the Database backup file.
Detailed Step-by-Step Instructions from Google:
Detailed instructions directly from Google on how to share a file via Drive can be found here, including a step-by-step walk-through of the process. In Step 2 of the Google documentation, the most secure option for sharing a file is to 'Share with Specific People' by entering their email address. Google will then automatically send an email alerting the user that a file has been shared and also include a direct link to access the file.