
ATA Codes
The ATA code system is a database that allows a user to easily store and use discrepancies based on a code.
Labor Kits
Labor kits are an easy way to frequently use the same multiple items along with appropriate parts for those items.
Jump to Section:
Note: If planning to use the 'Show as One Item' display option for the labor kit, add the verbiage that should be displayed on the invoice/estimate to the discrepancy of item #1 of the kit.
Create New Labor Kit or ATA Code from Existing Work Order
To save a Labor Kit or ATA Code from Items (discrepancies, corrective actions, and parts) on an existing Open Work Order (if W/O has been closed, it will need to be reopened before the new Labor Kit/ATA Code can be created), select Add ATA Code or Add Labor Kit from the + in the top right of the section. From the Create Labor Kit from Items screen, enter the Name, Description, Start at Item #, and Last Item # to be added. This will automatically create a new Labor Kit or ATA code from the existing item(s).

Proceed to Config > Labor Kits & ATA Codes, pull up the newly created kit, and add any additional items, limits, or media.
Manually Build a New Labor Kit
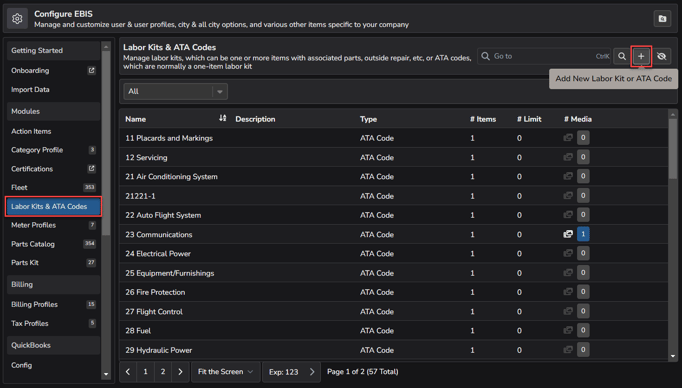
From the Add New Labor Kit or ATA Code Screen, enter a name for the new kit and click Add to return to the full Labor Kits & ATA Codes List or Add and Goto to add Limits, Items, and additional details for the newly created Labor Kit.

Clicking Add and Goto will pull up the Manage Labor Kit screen, where limits, pricing, items, and media can be added. From the Main Info subtab, description, notes, and labor price options for the Labor Kit can be set.

Availability of Labor Kits can be limited to specific types of W/Os (Ex: for certain Make, Model, Aircraft Type, etc.). This can be accomplished by clicking the + in the top right of the Limits subtab and selecting the Limit Type and the Related Asset from the appropriate dropdowns and then clicking Add or Add and Close.

Items can be added to the Labor Kit or ATA Code from the Items subtab by clicking the + in the top right of the section and then entering the information for that item (Discrepancy, Corrective Action, Item Details, and Billing Info) and clicking Add and Goto. Repeat the process for each item that needs to be added to the Labor Kit. (Only one Item can be added for an ATA Code).

Once the item has been created, Parts, OSR, and Media can be added. By clicking the + in the top right of the section, Parts and/or Outside Repair can be added.

Photos, videos, or documents related to the Labor Kit or ATA Code can be added under the Media subtab by uploading by clicking the paperclip icon in the top right of the section or inserting a link to the media by selecting the link icon in the top right.

The edit history of that Labor Kit or ATA Code can be found under the Edit History subtab.

Add a Labor Kit or ATA Code to a Work Order
To use a previously saved Labor Kit or ATA Code on a work order, select Add ATA Code or Add Labor Kit from the + in the top right of the section.

Find and select the Labor Kit or ATA Code from the drop-down. Then click Add or Add and Close.

The selected Labor Kit or ATA Code will now display as a new item (or items, depending upon the setup) on the W/O.
Edit an Existing Labor Kit or ATA Code
To edit an existing Labor Kit or ATA Code, proceed to Config > Labor Kits & ATA Codes, find and double-click on the record that you wish to edit. From the Main Info subtab, description, notes, and retail price for the Labor Kit/ATA Code can be managed.

Availability of Labor Kits or ATA Codes can be limited to specific types of W/Os (Ex: for certain Make, Model, Aircraft Type, etc.). This can be accomplished by clicking the + in the top right of the Limits subtab and selecting the Limit Type and the Related Asset from the appropriate dropdowns and then clicking Add or Add and Close. Existing limits can be deleted by enabling the checkbox and selecting the delete/trash icon in the top right of the section.

Items can be added to the Labor Kit or ATA Code from the Items subtab by clicking the + in the top right of the section and then entering the information for that item (Discrepancy, Corrective Action, Item Details, and Billing Info) and clicking Add and Goto. Repeat the process for each item that needs to be added to the Labor Kit. (Only one Item can be added for an ATA Code). Remove an existing item by checking the box to the left of the item to be removed and clicking the delete/trash icon.

Once the item has been created, Parts, OSR, and Media can be added. By clicking the + in the top right of the section, Parts and/or Outside Repair can be added.
Photos, videos, or documents related to the Labor Kit or ATA Code can be added under the Media subtab by uploading by clicking the paperclip icon in the top right of the section or inserting a link to the media by selecting the link icon in the top right.

The edit history of that Labor Kit or ATA Code can be found under the Edit History subtab.

Rename, Inactivate, or Delete a Kit
To rename, inactivate, or delete an existing Labor Kit or ATA Code, proceed to Config > Labor Kits & ATA Codes, double click the Kit/Code that needs to be renamed, inactivated, or deleted. From the Main Info subtab, click the Hamburger menu (three horizontal lines) in the top right of the section and then the appropriate option.

Access Requirements/Config Settings Related to Labor Kits and ATA Codes
User Profile Config settings related to Labor Kits and ATA Codes below:
